HTTP File Server (HFS) is a free lightweight and user-friendly web server software designed to help users easily share and distribute files over the internet using the HTTP protocol. It turns your computer into a temporary file-sharing server, allowing others to access and download files from your machine using a web browser or other HTTP-capable client.
HTTP File Server (HFS) is typically used for small-scale file sharing or quick file transfers. It provides a simple web-based interface that allows users to navigate through folders and files, download files, and even upload files to your server if you permit them to do so. HFS does not require complex configuration or installation processes, making it a straightforward solution for sharing files on-demand.
Here are some of the features of HFS:
- Easy Setup: HFS is known for its simplicity in installation and setup. It doesn't require extensive technical knowledge, making it accessible to a wide range of users.
- Web-Based Interface: HFS provides a user-friendly web interface that allows users to access files and folders using a web browser. This eliminates the need for clients to install additional software to access shared files.
- File Management: Users can navigate directories, create folders, and perform basic file management tasks such as renaming, moving, copying, and deleting files.
- File Uploads: HFS allows authorized users to upload files to your server, making it useful for collaborative projects or receiving files from others.
- Customization: Users can customize the appearance of the web interface to some extent, including changing colors, fonts, and adding custom banners.
- Password Protection: You can set passwords to restrict access to certain files or folders, adding a level of security to your shared files.
- User Management: HFS enables you to create user accounts and control their access permissions, allowing you to specify who can access, download, and upload files.
- Bandwidth Control: You can limit the amount of bandwidth that HFS uses, ensuring that it doesn't consume excessive network resources.
- Remote Access: HFS allows users to access shared files remotely, making it a useful tool for accessing files from different locations.
Here are some of the pros of using HFS:
- Free and open-source: HFS is free to use and its source code is available for anyone to inspect and modify.
- Simplicity: HFS is incredibly easy to install, configure, and use, even for individuals with limited technical expertise.
- Quick Sharing: It provides a rapid way to share files without the need for complex setups or third-party services.
- No Size Limitations: HFS doesn't impose strict file size limits, enabling you to share large files that might be too large for email attachments.
- Minimal Resource Usage: HFS is lightweight and doesn't consume significant system resources, making it suitable for running on older hardware or machines with limited processing power.
- Privacy and Control: You have complete control over the files you share and who has access to them, ensuring privacy and security.
- No Cloud Dependency: HFS allows you to share files directly from your computer without relying on third-party cloud services.
It is portable and can run on Windows, Linux, and macOS.
Overall, HFS is a great option for sharing files with a small group of people. It is easy to use, secure, and scalable. If you need a simple way to share files, HFS is a good choice.
HFS - Changelog.
How to use HFS:
Let's dive into specific actions and how to use HFS:
- Accessing the Admin Panel: When you run HFS, you can access the Admin-panel by opening a web browser and navigating to http://localhost:8000/~/admin. This allows you to manage and configure the server.
- Managing Shared Files:
- 1. Adding Shared Files:
- Navigate to the "Shared files" section in the Admin-panel.
- Click "Add" to select and add files you want to share with others.
- 2. Virtual File System:
- Files displayed in the "Shared files" section are part of the virtual file system.
- Renaming or deleting files here is virtual and only affects what is presented to users.
- 1. Adding Shared Files:
- Managing User Accounts: In the "Accounts" section of the Admin-panel, you can create user accounts with admin permission to access the administration remotely.
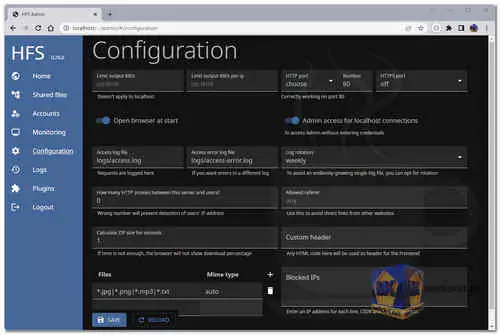
- Configuring Server Options:
- Port Configuration:
- HFS is configured to work on port 80 by default, ensuring it's correctly working on this port.
- The setting "Open Admin-panel at start" ensures that the browser is automatically launched with HFS.
- Port Configuration:
- Bandwidth Limit: Bandwidth limits can be set for upload and download speeds.
- Admin Access: "Unprotected admin on localhost" allows accessing the Admin-panel without entering credentials when accessed locally.
- Monitoring Server and Logs:
- In the "Monitoring" section, you can monitor server activity, including HTTP port, HTTPS status, current connections, data sent and received, and speed of data transfer.
- You can access logs like "access.log" and "access-error.log" to view requests and errors.
- Internet and HTTPS Configuration:
- Configure settings related to Internet access, HTTPS, and SSL certificates in the "Internet" section.
- You can enable HTTPS and generate a certificate using Let's Encrypt for secure communication.
- Managing Plugins: The "Plugins" section allows you to manage installed plugins, including their names, versions, and descriptions.
- Customizing Front-end with HTML: You can customize the HFS front-end by adding HTML code in the "Custom HTML" section. The code is saved to the "custom.html" file.
- Language and Translation: You can specify the preferred language for the front-end in the "Language" section.
- Logging Out: Click on "Logout" to log out of the Admin-panel if needed.
This information should help you navigate and use the HFS Admin-panel effectively for configuring and managing your file sharing server.

 English
  Français
  العربية