AutoPlay Media Studio is a powerful and versatile software development tool designed for creating interactive multimedia applications, CD/DVD autoplay menus, presentations, kiosks, and much more. It caters to both beginners and experienced developers, offering an intuitive drag-and-drop interface and extensive features for building complex applications...
AutoPlay Media Studio Key Features:
- Drag-and-drop interface: No coding experience is required to create basic applications. Simply drag and drop various objects onto the workspace to build your project.
- 20+ visual objects: A wide range of objects are available, including buttons, images, videos, text, menus, web browsers, databases, and more. Each object has its own customizable properties and functions.
- Visual scripting: For more complex applications, AutoPlay Media Studio offers a visual scripting language called "Action Scripts." This allows you to create custom logic and automate actions without writing traditional code.
- Multimedia support: Play audio, video, and animation files within your applications. AutoPlay Media Studio supports various formats, including MP3, WAV, WMV, AVI, and FLV.
- Web interaction: Integrate web pages and online content directly into your applications using the built-in web browser object. This allows you to access online resources and provide dynamic content.
- Database connectivity: Connect to external databases to store and retrieve data. This enables you to create database-driven applications for managing information.
- CD/DVD autoplay: Create professional-looking autoplay menus for your CD and DVDs. These menus can launch programs, play videos, and display information.
Other features of AutoPlay Media Studio:
- Project manager for organizing your projects.
- Multi-language support.
- Built-in help and documentation.
- Large community of users and developers.
- Extensive online resources and tutorials.
- Here's a more detailed breakdown of some of the key features:
Visual objects:
- Buttons: Create buttons to trigger actions when clicked.
- Images: Display static images or animated GIFs.
- Videos: Play videos within your applications.
- Text: Display text with various formatting options.
- Menus: Create drop-down menus for navigation or user input.
- Web browsers: Embed web pages and online content.
- Databases: Connect to databases and manipulate data.
- Input fields: Allow users to input data using text boxes, buttons, and other controls.
- Timers: Trigger actions automatically after a certain time.
- Variables: Store and manipulate data within your applications.
- Conditions: Create branching logic based on user input or other conditions.
- Loops: Repeat actions multiple times.
Action scripting:
- The visual scripting language allows you to define custom logic and automate complex tasks.
- You can combine various actions, conditions, and loops to create powerful applications.
- AutoPlay Media Studio provides a rich library of built-in actions for various purposes.
- You can also write your own custom scripts using JavaScript.
CD/DVD autoplay:
- Create professional-looking autoplay menus for your CDs and DVDs.
- These menus can launch programs, play videos, and display information.
- AutoPlay Media Studio provides a dedicated interface for designing and customizing autoplay menus.
- You can also use templates and wizards to get started quickly.
Overall, AutoPlay Media Studio is a comprehensive tool for creating interactive multimedia applications without coding. It offers a user-friendly interface, powerful features, and extensive online resources, making it a great choice for both beginners and experienced developers.
AutoPlay Media Studio - Changelog:
- Feature: Upgraded Lua scripting engine to version 5.3.6.
- Feature: Added LuaSocket and LuaSec modules to distribution.
- Feature: Added LuaFileSystem module to distribution.
- Feature: Added Wow64 Actions plugin to distribution.
- Feature: Added ODBC Actions plugin to distribution.
- Feature: Possibility to suppress the runtime error dialog.
- Feature: Added LuaSocket & LuaSec template (sample project).
- Feature: Added support for Firebird to LuaSQL modules.
- Feature: Added Lottie File template (sample project).
- Feature: Added Metro transition template (sample project).
- Feature: Updated internal script editor for bitwise operators syntax.
- Fix: Detection of installed Edge WebView2 Runtime could not work on older versions of Windows.
- Change: Flash objects, actions and startup movies were deprecated.
- Change: Plugins now require the use of SDK v3.
How to use AutoPlay Media Studio:
Here's a step-by-step guide to get you started with AutoPlay Media Studio:
1. Starting a New Project:
- Open AutoPlay Media Studio.
- In the Welcome dialog, choose "Create a new project."
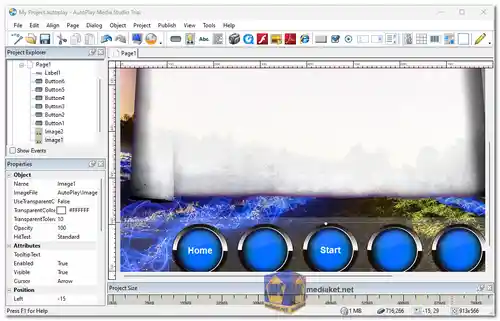
2. Building your User Interface:
- AutoPlay uses a drag-and-drop interface. The workspace is where you'll visually design your application.
- You can add elements like buttons, images, and text boxes by dragging them from the Object window onto your workspace.
- Double-click on any element to edit its properties, like text, size, and position.
3. Adding Functionality:
- AutoPlay allows you to define actions for your elements. Right-click on an element and select "Properties."
- In the properties window, you'll find an "Actions" tab. This is where you can choose what the element does when clicked, for example, playing a video or launching another program.
4. Including Media:
- You can add various media files like images, videos, and audio to your project.
- Click the "Insert" menu and choose the file type you want to add. Alternatively, you can drag the media files from your computer directly into the workspace.
5. Organizing your Project (Optional):
- AutoPlay allows you to create multiple pages within your project. This can be useful for complex applications.
- You can add new pages by right-clicking in the workspace and selecting "Insert Page."
6. Previewing your Project:
- Before publishing, it's always a good idea to preview your application.
- Click the "Run" button on the toolbar. This will launch your project in a separate window, allowing you to test its functionality.
7. Publishing your Project:
- Once you're satisfied with your project, you can publish it for distribution.
- Go to the "Publish" menu and select "Build." Here you can choose the output format, such as an executable file (EXE) or a CD/DVD autorun project.
Learning Resources:
- While the steps above provide a basic overview, consider exploring the following resources for a more in-depth understanding:
- Indigo Rose Software offers video tutorials: https://www.indigorose.com/autoplay-media-studio/video-tutorials/ although they may be for an older version, the concepts remain applicable.
- The official AutoPlay Media Studio User's Guide can be found through online searches.
AutoPlay Media Studio tutorials